
Over my career, I’ve often come across two common questions from lab users. And honestly, both are exactly what OpenLab user management is designed to solve:
- When reviewing an analysis report, how does the reviewer know who performed the analysis?
- What if someone accidentally changes a method — can we prevent that permanently?
Regardless of the reason, OpenLab user management in Agilent OpenLab ChemStation already covers both scenarios. In this guide, I’ll walk you through a simple, practical way to activate it.
Why OpenLab User Management Matters
With OpenLab user management, you can assign individual logins to each user. As a result, every run is tied to a specific name in the analysis report.
At the same time, you can control permissions using roles. For example, you can prevent certain users from modifying or saving methods — which helps protect your system from accidental changes.
Preparing for OpenLab User Management Setup
Before jumping into the setup, it’s a good idea to prepare a simple table.
Admin Account (for the whole lab)
- Username: used to log in
- Password: used to log in
- Full Name: appears in the analysis report
By default, the admin account has full access.
User Accounts
For each user, prepare:
- Username: used to log in
- Password: used to log in
- Full Name: appears in the analysis report
- Description: optional (not shown in report)
- Role: define access level
Typically, users fall into two groups:
- Full access (“everything”)
- Run-only access
Depending on your lab, you can define more roles. However, it’s best to finalize this with management before implementing.
Step-by-Step Guide to OpenLab User Management
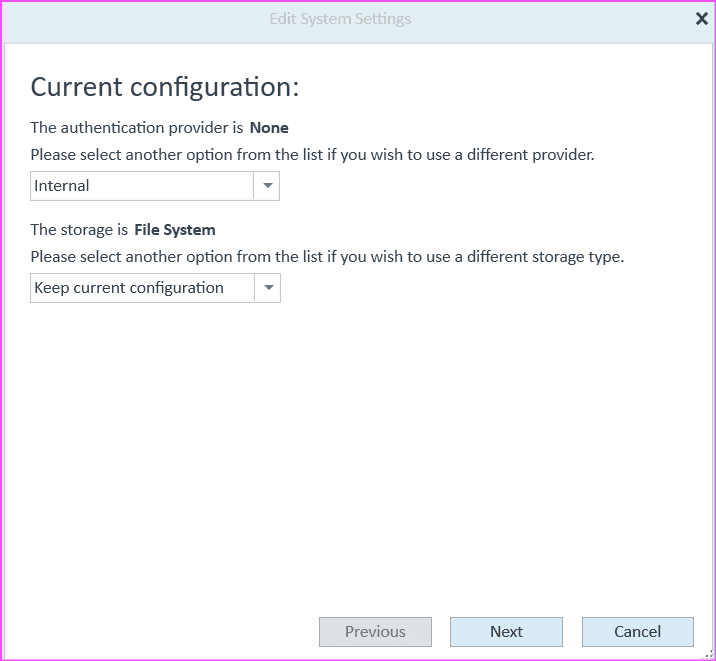
Step 1: Switch to Internal User Management
- Close both OpenLab ChemStation online and offline
- Launch OpenLab Control Panel
- Select Administration (bottom left)
- Select System Configuration (top left)
- Click Edit System Settings
- In the first dropdown, select Internal → click Next
Step 2: Create Admin Account
- Click Create Account
- Enter Username
- Enter Full Name
- Enter Password
- Confirm Password
- Click OK → Next → Apply
- Confirm changes
- Log in using admin credentials
Step 3: Configure Security Policy
- Go to Administration
- Click Security Policy
- Change max unsuccessful login attempts: 3 → 99
- Change account lock time: 5 min → 1 min
This becomes more practical when users forget passwords.
Step 4: Configure Roles in OpenLab User Management
Click Roles.
You can:
- Use default roles
- Create new roles
- Modify existing roles
For this guide, we assume all users have “Everything” role.
Step 5: (Optional) Use Groups
Click Groups.
Groups help simplify OpenLab user management:
- Assign roles to a group
- Add users to the group
- Users inherit roles automatically
However, if all users have the same role, you can skip this.
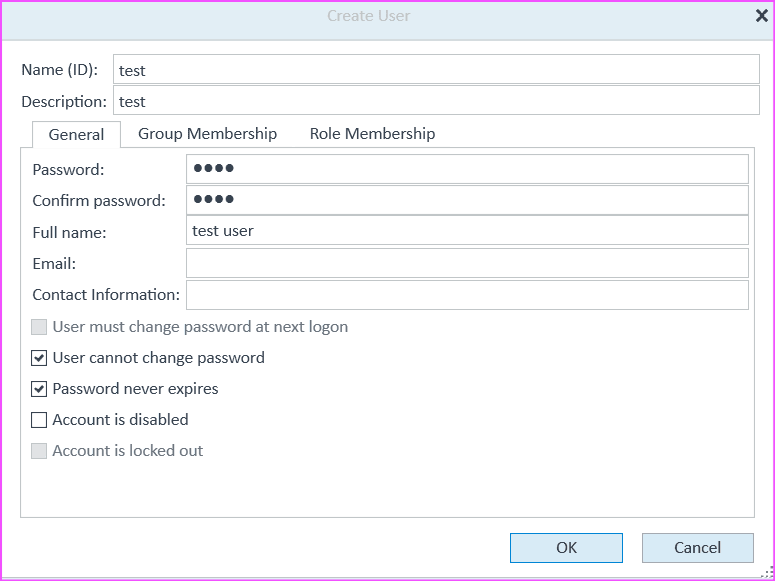
Step 6: Create Users
Click Users, then enter:
- Name (ID)
- Password + confirmation
- Full Name (for report)
Settings:
- Untick “User must change password”
- Tick “User cannot change password”
- Tick “Password never expires”
If not using groups:
- Go to Roles tab
- Assign “Everything” role
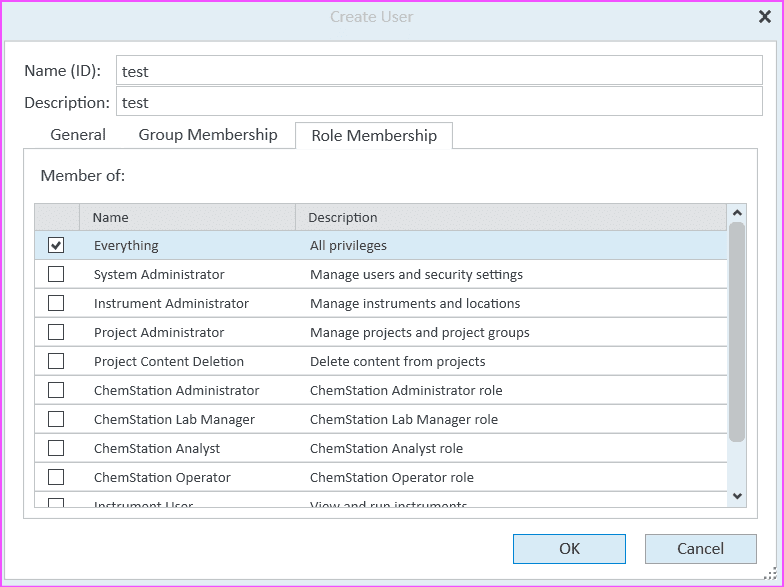
Repeat for all users.
Key Takeaways
- OpenLab user management allows individual logins for traceability
- Each analysis report shows the actual user
- Roles prevent accidental method changes
- Groups simplify permission management
- Setup is straightforward and practical
Explore More Practical OpenLab Tips
If you’re working with OpenLab regularly, you may also find other posts in OpenLab ChemStation GC Guides useful:
- Agilent GC Firmware: How to Check and Update Your GC Easily
- A Simple ChemStation Sequence Command That Automatically Loads Your Standby Method
- ChemStation Blank Run: Start a GC Run Without Injecting Anything
- OpenLab GC Configuration: Step-by-Step Setup Guide
Ready to Improve Your Lab Workflow?
Setting up OpenLab user management takes less time than you think — but it can significantly improve traceability and control in your lab.
If you haven’t implemented it yet, now is a good time to start.